
Introduced in iOS7, Apple's “Switch Control” is an accessibility feature that allows users with very limited mobility to control their entire iPhone, iPad, iPod Touch, Mac computer, or Apple TV in combination with ability switches and other adaptive devices for mobility impairments. It's the built-in software that Tecla users have access to through our hardware. With Switch Control users unable to use the touch screen can navigate the device, select any screen item, and even emulate more complex gestures (e.g. dragging, pinching, etc) by simply clicking a button, blowing, blinking or using other alternative inputs.

Switch control can be used with as little a single switch while multiple switches (for instance, a joystick, or 4 buttons) can mean very quick navigation. A single switch setup uses Switch Control “Auto-Scanning” function that automatically highlights item by item of the user interface with the user clicking the switch when the desired item is highlighted. Switch Control has an option, “Group Items”, that can group items to improve navigation, for instance, on the main screen items are highlighted by rows of icons, and when a particular row is selected the system scans icon by icon. Scanning speed can be modified and most young users operate at a scanning speed that is difficult to keep up with for the casual observer!
Auto-Scanning is used when using a single switch, but the device navigation can be sped up by using more than 1 switch. For instance, a joystick would allow previous and next navigation instead of waiting for Auto-Scanning to reach an item of interest. Read on for a more detailed description of switch control using external switches.
Switch Interfaces, like the tecla-e, act as a wireless link between the switch (or switches) and the iOS device. This is both convenient, as you have no cords hanging out of your mobile device, and necessary since there are no “input” plugs that would accept the switch (your headphone jack is an output jack only). The more switches you use, the more flexibility in how you control the device and the faster the navigation.

Using iOS Switch Control, there are 4 main methods to interact with your iOS device:
- Auto-Scanning: Screen items are automatically highlighted until you select one. This method is the simplest and requires just one switch.

- Step-Scanning: In this method, you utilize more than one switch to speed up navigation. One switch is set to “Select” and the other one (or more) switch controls the navigation elements (next or previous). This method requires at least 2 switches and can speed up navigation substantially.
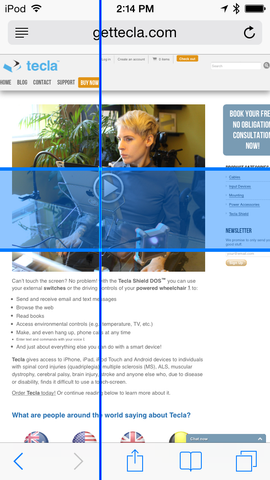
- Point Mode: In this mode, you can use a single switch to select an arbitrary point on the screen (vs icon scanning like in the previous mode) using a scanning vertical bar and after and horizontal scanning bar to select an XY coordinate on the screen. Once you selected the coordinate you can perform different actions from tapping into holding or dragging or start a multiple finger gesture (only requires one switch). This mode is useful when the interface cannot recognize screen items to interact with, such as playing “Angry Birds” or interfaces with too many items like when web browsing.
- Additional features: If you are able to use 3 or more switches (the Tecla will accept up to 6), you can assign arbitrary functions to each switch, like changing the volume and pulling up the home screen. An electric wheelchair user of ours has 6 switches and uses 4 for navigating each direction, the 5th for selecting an item, and the 6th for calling Siri quickly.


Once you have paired your tecla-e or Tecla Shield with iOS, you can find Switch Control under Settings> General> Accessibility> Switch Control. There you can assign each switch input of your Tecla device to specific Switch Control actions. Go to Switches, select External and then press a switch connected to your Tecla to assign it a function. Repeat this process for all switches connected to your Tecla that you would like to use.
These are the available Switch Control actions you can assign to switches in iOS:
Navigation Actions (Found under the “Scanner” Title):
- Select Item: Selects the highlighted item. If you are using a single switch, you should assign it to this action.
- Scanner Menu: Opens the Scanner Menu to access the Switch Control advanced functions and settings.
- Resume Auto-Scanning: Restarts auto-scanning of actionable items.
- Move to Next Item: Highlights the next actionable item.
- Move to the Previous Item: Highlights the previous actionable item.
- Stop Scanning: Stops automatic scanning.
System Actions:
- Tap: Taps the highlighted item.
- App Switcher: Opens the App Switcher.
- Home Button: Sends a Home Button event.
- Notification Center: Opens the Notification Center.
- Decrease Volume: Decreases the device volume.
- Increase Volume: Increases the device volume.
- Siri: Calls Siri for voice control of the device.
The simplest configuration would be using a single switch assigned to “Select Item”, with Auto-Scanning turned on. After that you can assign other switches for many different actions like moving to the next or previous item, calling Siri, changing the volume, etc.
In addition, switch control can be highly customized to suit the specific needs of many individuals including:
- Adjust the scanning speed (young users will insist this speeds up within minutes of starting to use a device!!)
- Add a pause for the first item in a cycle (Helps you get your bearings on a new screen - otherwise, the scanner will leave this item before you have digested the screen contents)
- Automatically select an item when clicked instead of pulling up the scanner menu (Switch Control default setting pulls up the scanner menu on a click so that users that cannot double click can still access the advanced functions of the scanner menu)
- Set a hold time before performing an action (For users with poor movement control where unintentional short clicks are common – the device would then wait until a longer click is registered to eliminate these false positives)
- Set to ignore repeated inputs (useful for users with poor movement controls (like tremors) where multiple clicks are common for each intended “Select” action)
- Adjust the scanning speed in Point Mode (the “lines” can scan very quickly in the default settings and many users want this slowed down)
- Customize the Scanner Menu items
- Change icon highlighting colour or thickness
Watch Tecla user Christopher Hill's video on Switch Control and the Tecla Shield:
Related Articles:
- 9 Surprising Things Quadriplegics can do with an iPhone or iPad
- iPhone and iPad accessibility options for quadriplegics and other users with limited mobility
- 4 Ways Quadriplegics Can Use An Ipad or iPhone
- Siri vs iOS Switch Control for hands-free iPhone access
- Using iPad AAC apps with switch control for speech and motor impairments
Leave a comment: