
We’ve heard a number of times that access to the iPhone (or iPad) would be solved IF individuals with limited mobility could have access to Siri or some other powerful voice recognition protocol or app. While Siri is useful to people unable to use touchscreens, the number of situations it addresses is actually quite limited. Here we compare access to the iPhone using Siri vs the “Switch Control” access method - Apple’s switch-access feature first incorporated into iOS7. “Switch Control” is a robust accessibility framework developed by Apple to accommodate users with limited mobility.
First off, we’re assuming that users with disabilities primarily want a hands-free solution for phone calls (including initiating, using business phone menu systems, and hanging up calls) and secondarily want to do the other things that make smartphones…. Well… smart! These include:
- Check voicemail
- Sending and receiving texts
- Taking notes
- Music (play, pause, skip, volume)
- Accessing social media (Facebook, Twitter, Messaging apps etc.)
- Calendar, calculator, etc.
Lastly, we will also assume that users need to have a solution that works well in both a wheelchair and in bed.
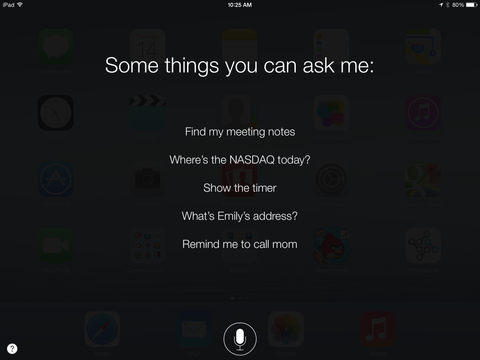
So what sort of commands work well with Siri? Typically simple commands issued to Siri work well to control the device hands free. For example:
- Wake me up tomorrow at 7 AM
- Call <name in contact list>
- Text <name in contact list> “Ok, I’ll be there in 10 minutes.”
- Read my new messages (VM, texts, emails?)
- Read it again
- Reply “that’s great news”
- Play <name of playlist or song>
A more complete list of Siri commands can be found here: http://techblog.tv/full-list-of-siri-commands-how-to-use-siri/
So why isn’t Siri a robust solution for those with limited mobility in accessing the iPhone? Simply, Siri was never built to be a robust hands free access solution for the disabled. Here are 5 reasons Siri falls short for helping those with mobility disabilities:
1) You need get Siri’s attention
First step to Siri is to activate and get Siri’s attention. This is impossible for anyone with severely limited mobility, like quadriplegics or those with gross motor control issues, as they cannot press and hold the “home” button.
2) Pardon Me?
While speech recognition has become very good recently, there are still significant issues in detecting what you say in noisy environments (outside in urban environments, any indoor gathering where people are talking, windy days) or if you speech is weak (far away from device, lying down where your voice is weaker). Siri isn’t much good if she can’t understand your simple commands!
There is a great example a user passed along to us of using voice recognition to turn on a stereo that was inadvertently turned to full volume. Speech recognition can't function when you are competing with a full blast stereo! It took a few hours for a caregiver to arrive and help turn that stereo down!
3) Siri requires a data connection to work
All modern mobile speech recognition, including Siri, requires data to be transmitted to function. This adds a data load that you might not be expecting. Users should be aware that data on your cell service may be used even when the phone is connected to wi-fi.
4) Siri ignores you once you initiate a call
Once you have initiated a call using Siri, you are basically on your own. This makes sense as Siri assumes you are talking to someone else and does not attempt to interpret your words. This means that Siri is useless for a few key functions:
- Siri cannot help navigate a business’s phone menu system. This includes things like dialing extensions, navigating customer service menus, selecting options when leaving voice mail, using telephone banking etc.
- Siri cannot hang-up your call. This makes sense for the reasons above, but is usually a surprising point for many people!
5) Siri gives very limited app access
You can get Siri to open an app in most cases (including the browser), but again, it’s surprising how little you can do with Siri once you are there. For instance:
- You can start the camera app, but you can't take a picture – so it’s really only good for checking whether you have something stuck in your teeth.
- You can post a short message on FB or send a short email, but you can’t scroll through emails, FB posts or tweets. In essence, you can produce, but not consume most social media.
- You can perform searches but you can't scroll through the results
- You can’t move through a web page in the browser or click links
Other Considerations:
- As a general principle, you should always have low-tech alternative to speech recognition to accommodate voice changes (e.g., in bed), or variable environmental noise (esp. with a cell phone), or novel vocabulary.
- Voicemail does not appear to be accessible through Siri unless the plan includes “Visual Voicemail
What about iOS Switch Control Mode?
Generally speaking, you can access practically everything (including Siri!) on your device by enabling the “Switch Control” accessibility feature in iOS7, which was first introduced by Apple in September 2013. The only downside is that unfettered access requires a switch (like a simple accessibility button, sip/puff, joystick or any manner of other accessibility switch familiar to those with limited mobility), and a Bluetooth Switch Interface, like the Tecla Shield.
Simply put, accessibility switches cannot be plugged directly into iOS devices like the iPhone (headphone jacks are only for outputting sound, not input). For users with more than one switch, the switch interface also acts as a “hub” aggregating the inputs and feeding them to iOS. With the Tecla Shield, up to 6 different switches can be used (including a joystick, which would count as 4 switches)
Single switch
Users with a single accessibility switch can access the entire iPhone (or iPad) using the “switch control” auto-scanning feature in iOS7. Using this feature, a button push initiates the auto-scanning feature (see below for step by step images), which scans icons on the screen in row groups. A second push selects the current row being scanned. A third push selects the icon being scanned in the row (which usually opens an app). Within an app or menu, the same holds true as the auto-scanning will keep moving through the items until you arrive at the one you want.
Speed can be adjusted, and in our experience, everyone wants things to speed up as they get familiar with the setup. We have lots of users where we can’t even keep up with what they are doing!!
Gestures are also possible with even a single switch. Double-clicking pulls up a context menu that allows the user to select any number of gestures like swipe, select and drag, zoom etc.
Multiple Switches
Users able to user more than one switch can improve navigation speeds as the new switch(es) can be assigned functions other than “select”. The Tecla Shield accommodates up to 6 different switches. Switch 1 and 2 can be plugged directly into the Tecla, while switches 3-6 would require a “Multiple Switch Adapter” sold by Komodo, which is a hub that connects into the DB9 input of the Tecla Shield.
Joystick Inputs
Users able to use a joystick can plug the joystick into the DB9 port. A joystick acts like 4 switches in Switch Control. The Tecla also has a “4-way mode” (Pink mode) that works outside of the Switch Control framework and allows faster device navigation (e.g. a hold to the right emulates a swipe – something that speeds device navigation and ebook reading).
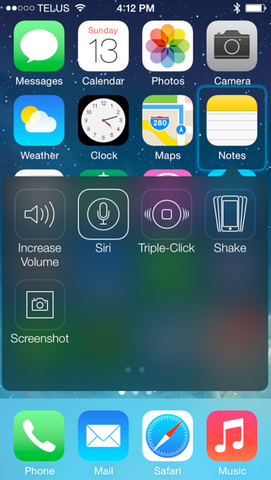
Bringing up Siri with Switch Control
Siri is available through Switch Control’s Scanner Menu under Device. The Tecla Shield also has a unique feature in the hardware that can summon Siri by just pressing-and-holding your main switch and after an adjustable hold time. Another alternative is to assign another switch to bring up Siri, which some users with multiple switches will prefer to do.
Siri is available through Switch Control’s Scanner Menu under Device. The Tecla Shield also has a unique feature in the hardware that can summon Siri by just pressing-and-holding your main switch and after an adjustable hold time. Another alternative is to assign another switch to bring up Siri, which some users with multiple switches will prefer to do.
Switch Control Basics (Mostly familiar, but with a couple of twists…)

(a) The scan uses a typical row-column pattern. When the row you want is highlighted, you hit the switch to select that row.

(b) The scan then goes across the selected row, permitting you to choose the app that you want to use.

(c) When you reach the app you want, you hit the switch, and…

(d) The scan indicator does a fill-in animation over a user-specified interval called the auto-tap interval. If you do nothing during that fill-in animation, the app’s icon will be tapped, and the app will run.
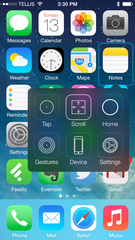
(e) If, however, you hit the switch a second time during the auto-tap interval, a menu of available actions will pop up, permitting you to choose other gestures and device functions (such as a scrolling gesture or simulating a press of the home button at the bottom of the device).

(f) What if you hit the switch by mistake? At the end of every scan sequence, a dashed box will appear on the group that was just scanned. This is the cancel function. Hitting the switch while the dashed line is visible will cancel the last scanning operation and move up one level in the scanning hierarchy. For example, if you were scanning within a row and you cancelled, the scan would start scanning entire rows again.
Other articles you might like:
- iPhone and iPad accessibility options for quadriplegics and other users with limited mobility
- 4 Ways Quadriplegics Can Use An Ipad or iPhone
- Using iPad AAC apps with switch control for speech and motor impairments

Leave a comment: