
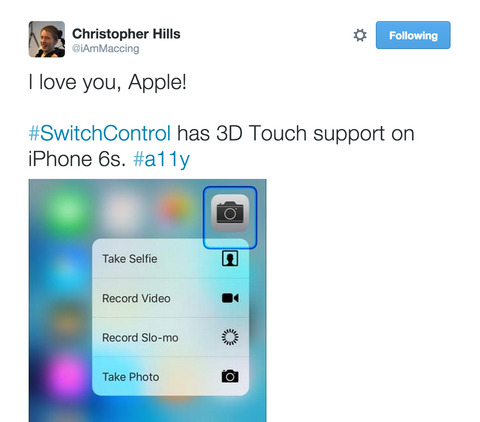
Apple’s operating system for the iPhone, iPad and iPod Touch was recently updated, and with this update comes some interesting new features. Two of the most relevant new features for accessibility are 3D Touch and Hey Siri. 3D Touch introduces a new way to interact with the screen by measuring the amount of physical force applied to the touchscreen. And Hey Siri allows voice command without having to press an actual hardware button, a feature that was previously only available while the device was plugged in.
Alongside these new features, improvements have been made to the existing array of touch-based accessibility features, including Switch Control, AssistiveTouch and a new feature called Touch Accommodations.
These new updates are especially relevant to current Tecla users and those with Apple devices who are wondering if Tecla is right for them. Here's a brief overview of how the new features work:
Switch Control
You might have already heard of Switch Control. It’s an accessibility feature that was introduced in iOS 7 which allows users with very limited upper-body mobility to control their entire iPhone, iPad or iPod Touch in combination with assistive devices like Tecla. With Switch Control and Tecla, users who are unable to physically access a touchscreen can navigate the device, select any screen item and emulate more complex gestures (e.g. dragging, pinching, etc) by simply clicking a button, blowing, blinking or using other alternative inputs like their wheelchair's driving controls.
Here’s a list of the new Switch Control features you can find in iOS 9.
Recipes
One of the most significant improvements is the ability to create Recipes, where a specialized action can be temporarily assigned to a switch instead of its normal action. Recipes can be used to perform an action that may be app-specific. For example: you can emulate a page swipe to turn pages in the Kindle app or tap the screen to play Flappy Bird (or any other game that requires fast tapping). You can also program more complicated things like a series of gestures.
We are really excited about this feature. We have a number of users who want to be able to complete tasks like reading without having to navigate complex menus, which was the only option in previous iOS versions. And this also opens up a huge number of games to Tecla users!
Check the "Turn Pages" Recipe in this video:
Scanning Style
In addition to Auto Scanning (where the system automatically scans the objects on the screen and the user presses the switch to select), as well as Manual Scanning (where one switch allows you to move through the different screen items and a second switch is used to select), iOS 9 introduces Single Switch Step Scanning.
In Single Switch Step Scanning, you use your switch to move from screen item to screen item. If you pause on an item for longer than a set time, that element will be activated. This is great for single-switch users who previously had difficulty with the timing required to press the switch to select an item while it was highlighted.
Long Press
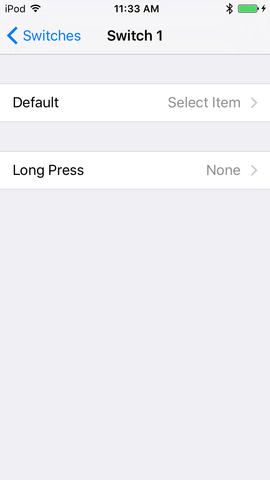
Another addition to Switch Control in iOS 9 is the ability to assign a second function to a switch by completing a long press. When you enable this and assign a time for the long press in the main settings area, you’ll see two options when assigning functions to switches: Default and Long Press (fig 1).
Tap Behaviour
The Scanner Menu gives you access to a lot of the functionality in Switch Control. From the Scanner Menu (fig. 3), you can perform a gesture, switch between item and point modes, change volume or mute your device. The Scanner Menu shows the most likely options (i.e. Tap, Home or Scroll) on its first page and additional functions in subsequent pages.
In the default mode, the Scanner Menu appears every time you select an item. You need to select Tap to activate an item. When Auto Tap is enabled, the Scanner Menu will only appear if you perform a double-click when selecting an item. A new option in iOS 9 is Always Tap, where Switch Control will always tap when selecting an item and the Scanner Menu icon will appear at the end of the scanning cycle (fig. 2).
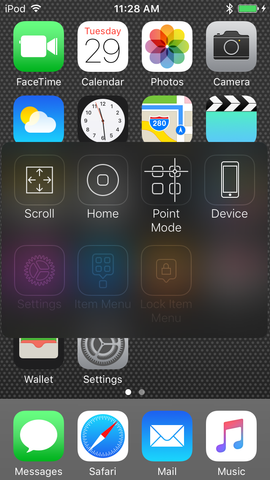
Fig. 2: Scanner Menu icon Fig. 3: Pop-up Scanner Menu
Related to tab behaviour, now there is an option to always tap the keyboard keys only, as you may not need to access additional functions when typing.
To learn more about Switch Control, check out the free iBook Handsfree: Mastering Switch Control on iOS by Christopher Hills & Luis Perez.
![]() AssistiveTouch
AssistiveTouch
People who have difficulty using a touchscreen directly may be able to use only one finger, their knuckle, other body parts, or aids such as a stylus, typing splint or mouth-sticks.
AssistiveTouch allows users who are able to touch the screen using point contact (as you would with a stylus or single finger) to access “multiple finger” or “custom gestures” functions. Additionally, users can access functions which are usually activated with hardware buttons (ex: Home, Siri, Lock Screen, Volume Control and Mute). For instance, a “pinch to zoom” function is enabled through a context menu which allows the user to select multiple finger gestures.
AssistiveTouch presents a button that eliminates the need to use multiple fingers or press the physical buttons on the device. You can access the notification and control centres, perform common or custom gestures, or access functions that are usually attached to a hardware button (ex: volume control, rotation or locking your device) via this button.
In iOS 9, you can customize the top-level menu in AssistiveTouch where you can now have up to eight functions in this menu (Fig. 4).
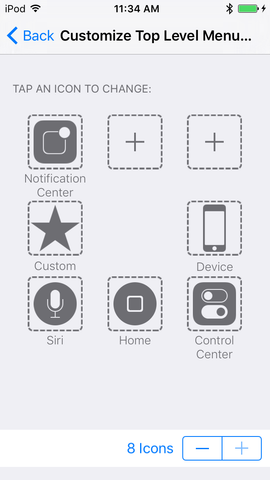
Figure 4: AssistiveTouch Menu Customization
Touch Accommodations
Touch Accommodations is an accessibility feature in iOS that adjusts the time-based sensitivity of the touchscreen to prevent unintended taps. There are three main components of Touch Accommodations:
- Hold Duration, which is the amount of time the screen requires a constant touch to register a single tap within an adjustable time duration. That time duration is displayed on the screen as a large touch target with the timer represented by a white ring (fig. 5).
- Ignore Repeat is the window of time within which all touches will be ignored, except for the last. There is no onscreen feedback for this feature.
- Tap Assistance works by assuming that a one-finger gesture is actually a tap. This target can be set to either the initial location of the gesture or the final location of the gesture. The intended location and time duration are shown on screen by a large touch cursor with a timer represented by a white ring (fig. 5).
Figure 5: Touch Accommodation Cursor
Call Audio Routing
This feature, previously named Incoming Calls, has been renamed in iOS 9. Call Audio Routing allows you to determine where to direct audio from a phone call or FaceTime, which can prevent unintended audio shared over Bluetooth speakers or focusing calls to Bluetooth headsets. This is very useful for those users with Bluetooth headsets or speakers as they can define the default device for audio.
Leave a comment: